---
title: How do I add a user to the urfuture platform?
description: How to add a user to the urfuture platform
---
[Skip to content](https://urfuturesupport.io/adding-a-user-to-access-the-platform#main-content)
English - United Kingdom
Show submenu for translations
[Customer Portal](https://urfuturesupport.io/enquiries?hsLang=en-gb)
[](https://www.urfuture.io/)
- [Knowledge Base](https://urfuturesupport.io/)
- [Update ur Contact Info](https://share-eu1.hsforms.com/2kgn53oGsSIao08evmmrqMw2eqle9)
Open main navigation
Close main navigation
- [Knowledge Base](https://urfuturesupport.io/)
- [Update ur Contact Info](https://share-eu1.hsforms.com/2kgn53oGsSIao08evmmrqMw2eqle9)
- English - United Kingdom
Show submenu for translations
- [Customer Portal](https://urfuturesupport.io/enquiries)
- [Customer Portal](https://urfuturesupport.io/enquiries?status=all&view=my_tickets&offset=0)
[Customer Portal](https://urfuturesupport.io/enquiries?status=all&view=my_tickets&offset=0&hsLang=en-gb)
How can we help you?
- There are no suggestions because the search field is empty.
1. [urfuture Support](https://urfuturesupport.io/?hsLang=en-gb)
2. [Company Profile](https://urfuturesupport.io/company-profile?hsLang=en-gb)
# How do I add a user to the urfuture platform?
## This article covers when to use Admin or Member permissions, how to invite users to the platform, and how to assign the appropriate access level. It includes what happens after an invitation is sent, common mistakes to avoid, and answers to frequently asked questions to help ensure users are added securely and correctly.
Adding users allows your team to collaborate within the urfuture platform. Assigning them access ensures they can contribute to the recruitment process while maintaining the appropriate level of security and control.
### Why Add a User?
Organisations often need multiple people involved in recruitment. Rather than sharing one login, each person should have their own account.
Adding individual users allows you to:
- Improve collaboration across recruitment teams.
- Track activity and accountability.
- Assign the correct permissions for each user.
- Maintain platform security.
- Ensure compliance with GDPR and audit requirements.
Each user receives their own secure login and only has access appropriate to their assigned role.
### **Before You Begin**
Before adding a user, ensure you have:
- Admin access to the platform.
- The user's correct email address.
- Decided whether they should be an **Admin** or a **Member**.
### How to Add a User
#### Step 1
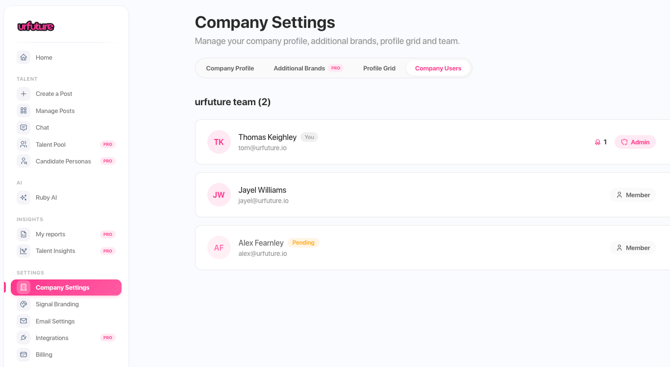
Navigate to **Company Settings**.
#### Step 2
Select **Company Users** from the top menu.
#### Step 3
Click **Invite Members**.
#### Step 4
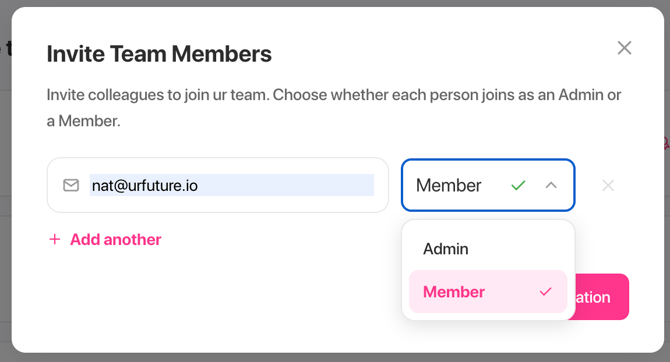
Enter the user's Email Address.
#### Step 5
Select the appropriate permission level:
- **Admin **
- **Member**
****
#### Step 6
Click **Send Invitation**.
The user will receive an email inviting them to create their account and access your organisation.
### Best Practice
#### Give the Lowest Level of Access Required
Only assign **Admin** access when it's genuinely needed. Most users only require **Member** access.
#### Never Share Accounts
Every user should have their own login.
This improves:
- Security
- Audit history
- Accountability
- GDPR compliance
#### Check Email Addresses Carefully
A mistyped email address means the invitation won't reach the intended user.
Always double-check before sending.
#### Review User Access Regularly
Remove users who no longer require access, such as employees who have left the business or changed roles.
#### Explain the Difference Between Roles
Before inviting someone, make sure they understand what their permission level allows them to do.
Changing permissions later is simple, but assigning the correct role from the start reduces confusion.
### FAQs
#### Who can add new users?
Only users with **Admin** permissions can add or manage users.
#### Can I change a user's role later?
Yes. An Admin can update a user's role if their responsibilities change. Simply select the 3 dots on the right-hand side of the associated user to edit their role type.
#### Can I resend an invitation?
Yes. If a user hasn't accepted their invitation, an Admin can resend it.
#### What if the user didn't receive the invitation email?
Ask them to:
- Check their Junk or Spam folder.
- Confirm the email address is correct.
- Ask an Admin to resend the invitation if necessary.
#### Should every recruiter be an Admin?
No. Most recruiters only need **Member** access. Reserve Admin permissions for users responsible for managing the organisation and platform settings.
### **Can multiple recruiters access our account?**
Yes! To add a user to your account, go to 'Company Settings', then 'Company Users', here you can add a recruiters email and they will receive an email to gain access to the platform. You can manage users here also.
### Troubleshooting
| Issue | Possible Cause | Resolution |
| --- | --- | --- |
| User didn't receive invite | Incorrect email address or spam filtering | Verify the email and resend the invitation |
| User can't manage settings | They have Member access | An Admin can change their role if required |
| User can't log in | Invitation not accepted or password not created | Ask them to complete the invitation process or resend the invite |
| Too many Admins | Incorrect permissions assigned | Review user roles and reduce Admin access where appropriate |
### Summary
Adding users correctly ensures your recruitment team can collaborate securely and efficiently. Always assign the appropriate permission level, avoid shared accounts, and review user access regularly to keep your organisation secure and well-managed.
- [Product](https://urfuturesupport.io/product?hsLang=en-gb)
- [FAQs](https://urfuturesupport.io/faqs?hsLang=en-gb)
- [Socials](https://urfuturesupport.io/socials?hsLang=en-gb)
- [Jobs](https://urfuturesupport.io/jobs?hsLang=en-gb)
- [Company Profile](https://urfuturesupport.io/company-profile?hsLang=en-gb)
- [Candidates](https://urfuturesupport.io/candidates?hsLang=en-gb)
[mailto:email@email.com](mailto:email@email.com)
Copyright © 2026, urfuture
```json
{
"@context" : "https://schema.org",
"@type" : "VideoObject",
"caption" : {
"@type" : "MediaObject",
"contentUrl" : "https://urfuturesupport.io/media-transcripts/461542318301/en.vtt",
"inLanguage" : "en",
"name" : "en Captions"
},
"contentUrl" : "https://145687761.fs1.hubspotusercontent-eu1.net/hubfs/145687761/video_assets/461542318301/inherited/web_optimized.mp4",
"dateModified" : "2026-08-28T13:43:49.468Z",
"duration" : "PT1M29S",
"height" : 720,
"name" : "Multiple Users",
"thumbnailUrl" : "https://145687761.fs1.hubspotusercontent-eu1.net/hubfs/145687761/Multiple%20Users.mov/medium.jpg",
"uploadDate" : "2026-08-28T13:43:42.413Z",
"width" : 1280
}
```